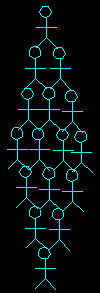
How To Make A Person
The first thing you need to learn is how to use edit in logo. To open
the LOGO edit window, type edit "person at the same place you always type
logo commands. A window will open that says this:
------------------------------------------------------------------
      to person
      end
------------------------------------------------------------------
You will type in the LOGO commands between these two lines. Here's the
code to draw a person:
-------------------------------------------------------------------
to person
rt 45
fd 20
rt 90
fd 20
bk 20
lt 135
fd 40
bk 10
rt 90
fd 20
bk 40
fd 20
lt 90
fd 10
seth 75
repeat 18[fd 7 lt 45]
end
-------------------------------------------------------------------
Here's what one person looks like:

Illustration Credit
Once you have defined and saved the PERSON in the LOGO edit window, you
can then use the command PERSON just like you use FD, CS, or HT. You have
defined a new LOGO command in other words. (The only problem is that you
lose this command when you quit out of LOGO, so you have created a new
temporary command.)
The trick here will be to properly position the turtle before you draw
each person. Drawing the person will be easy since all you have to do
is type PERSON (or whatever you decided to name it). The trick will be
to properly position each PERSON. You may want to use the SETXY command
to help you with this assignment. Consult the LOGO documentation or lesson
nine for more information on using SETXY. You may also wish to shrink the
person so you can fit all of them on the screen at once.
REMEMBER THAT ALL ASSIGNMENTS FROM THIS POINT ON MUST BE DONE IN EDIT.


